Week 1-2 Progress and Updates | GSoC 2025
GSoC 2025 | Week 2 Progress
🚀 Phase 1: Understanding the Workflow
The first phase of my GSoC journey was primarily focused on understanding the overall development workflow of GCompris. This included getting comfortable with the codebase, learning how different components interact, and setting up a smooth development environment. While I began exploring the documentation to better understand the structure and logic behind existing dataset editors, this is still an ongoing process and will evolve alongside my work. With the groundwork laid, I moved on to my first task — working on the “Learn Decimals” activity.
🧩 LearnDecimals Editor – Dataset Structure & Layout Overview
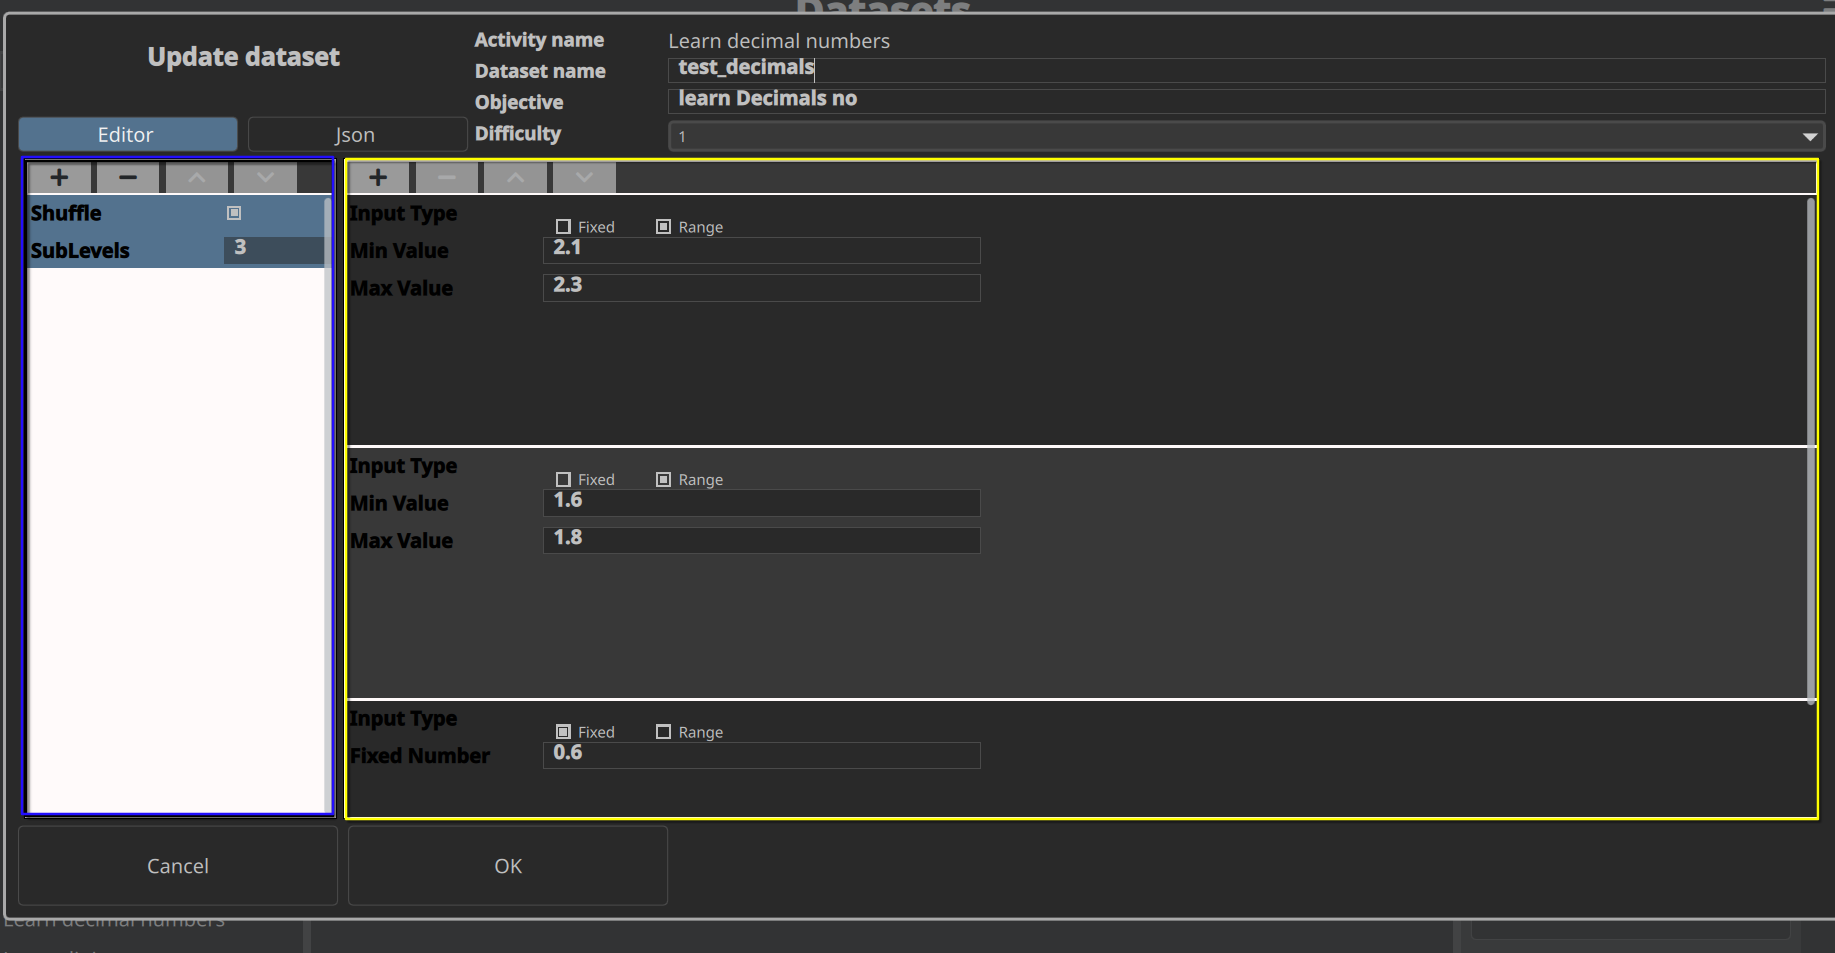
The LearnDecimalsEditor.qml file is responsible for generating the UI layout for editing datasets in the LearnDecimals activity inside the GCompris-Teacher interface.
The editor is visually split into two sections:
1
2
3
🔹 Left Panel – shows dataset-level fields using the mainPrototype

🔸 Right Panel – shows sublevel data (like equations) using the subPrototype
Each panel is dynamically generated using a FieldEdit component and a ListModel that describes which fields should be editable. 
1
2
3
4
5
6
 ListModel {
        id: mainPrototype
        property bool multiple: true
        ListElement { name: "shuffle";      label: qsTr("Shuffle");     type: "boolean";    def: "true" }
        ListElement { name: "subLevels";    label: qsTr("SubLevels");   type: "model";      def: "[]" }
    }
Above is the list model generated for the main prototype. This model is used to generate the left panel of the editor.
1
2
3
4
5
6
7
8
  ListModel {
        id: subPrototype
        property bool multiple: true
        ListElement { name: "inputType"; label: qsTr("Input Type"); type: "choice"; def: '["Fixed", "Range"]' }
        ListElement { name: "fixedValue"; label: qsTr("Fixed Number"); type: "string"; def: "" }
        ListElement { name: "minValue"; label: qsTr("Min Value"); type: "string"; def: "" }
        ListElement { name: "maxValue"; label: qsTr("Max Value"); type: "string"; def: "" }
    }
Above is the list model generated for the sub prototype. This model is used to generate the right panel.
To generate the datasets.
1
2
3
4
5
6
7
1.Build the app -> it generates two executables gcompris-qt and gcompris-teachers
2. Login and look for activity list -> select LearnDecimals
3.To share the dataset -> one needs to build connection.

    1.To build connection we need the gcompri-qt to be active and connected to same network and have same server Id to identify the server.
    2. send login list from the server
    3. send dataset list from the server
The path to test the dataset that gets stored could be checked .
1
2
3
4
5
6
7
8
9
10
11
12
13
14
15
16
17
18
19
20
21
22
23
24
25
26
27
28
29
30
31
32
33
34
35
36
37
38
39
40
~/.local/share/gcompris-teachers
#  this is location for the sqlite database
# we can check for our dataset that we newly created in the editor

sqlite> SELECT activity_id, activity_name FROM activity_ WHERE activity_name = 'learn_decimals';
35|learn_decimals
sqlite> .tables
_all_groups             _group_activity_result  group_
_all_groups_activities  _group_users            group_user_
_all_users_activities   _user_activity_result   result_
_daily_activities       _user_groups            teacher_
_daily_ratios           activity_               user_
_dataset_activity       dataset_
sqlite> SELECT * FROM _dataset_activity WHERE activity_id = 35;
42|35|learn Decimals no |test_decimals|1| [
    {
        "shuffle": true,
        "subLevels":  [
        {
            "inputType": "Range",
            "fixedValue": "",
            "minValue": "2.1",
            "maxValue": "2.3"
        },
        {
            "inputType": "Range",
            "fixedValue": "",
            "minValue": "1.6",
            "maxValue": "1.8"
        },
        {
            "inputType": "Fixed",
            "fixedValue": "0.6",
            "minValue": "",
            "maxValue": ""
        }
    ]
    }
]|learn_decimals
Now we move to learn_decimals Logic file learnDecimals.js where all the magic happens
It took a while to understand the work flow in logic file and to make it easier for us in the future I used mermaid and a tool to generate the flow chart from the code and the result is below a detailed flow chart that helps us understand the activity better . I suggest you to switch to light mode to better View the flow chart .
Having that at present we have a working editor for learn decimals and learn Quantities , with few changes to be made as per the reviews in future.
todos
1.The editor UI breaks (the issue with childRect height) that needs to be fixed.
2.Building editor for Learn decimals addition and subtraction.
3.Changing logic in Learn Decimals to adapt to new datasets for learn Decimals addition and subtraction.
👋 That’s All for Now!
Thanks for reading!
Feel free to reach out if you have questions or feedback.
Until next time — keep exploring, keep building, and see you around! 🚀
Stay connected and take care! 😊
